Tuesday 24 December 2013

Lindy's Stamp Gang Drcember Color Challenge

Hi All,

It's getting very close to Christmas Day and I can't wait!!  We are spending it with my family in Cork this year.  My children are still little so I am looking forward to christmas morning and seeing the wonder in their eyes.  I think this is the most splendid day of the year.

998076_10151641662013863_2057963122_n

I was recently in Athlone with my two little monsters and husband to participate in a Christmas Jamboree party hosted by the fantastic Create With Kate (Walsh) at the Hodson Bay Hotel.  I had a lovely time but I wasn't able to really get stuck into the classes because my children kept coming in and wanting me to go with them for one reason or another.  (I'll be going on my own next time :) !!!)

One of the classes I tried to do was Martina Downes Tim Holtz Christmas Wreath Class.  I was in and out of the room so much I ended up takeing lots of photos and buying the supplies I needed afterwards from Create With Kate, Cardz'n'Scrapz, Scrapbook.com and especially Lindy's Stamp Gang for their incredible sprays. 

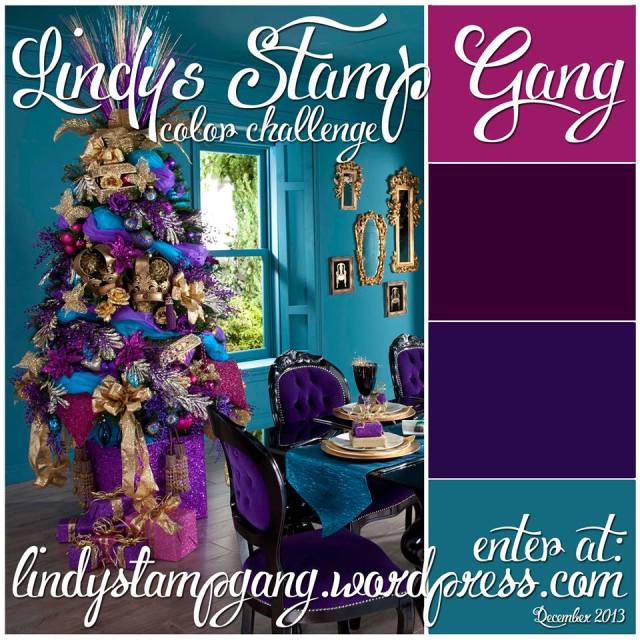
The LSG December color challenge is as shown above and I made this wreath based on the color scheme shown for a great friend Vicky.


I loved this color palette as all the colours are my favorites!!!


Supplies:-

Wooden Wreath from Penney's
Lindy's Stamp Gang Time Travel Teal Spray
Lindy's Stamp Gang Sweet Violet Purple Teal
Hunkydory Fairy Kisses Glitter
Ranger Grungeboard
Ranger Grungepaper

Sizzix - Tim Holtz - Alterations Collection - Bigz Die - Christmas - Holly Branch

Sizzix - Tim Holtz - Texture Fades - Alterations Collection - Christmas - Embossing Folders - Textured Poinsettia Pattern Set

Hot Glue Gun (essential)
Small set of battery operated fairy lights
Waxed thread to lace up skates
Flower Soft Snow (gives the blades of the skates the impression that the have ice shavings on them)
Kanban Snowflake Stickers
Viva Decor Silver Metallic Rub (to highlight embossed flowers and some areas of the wreath)
Rich Magenta and Teal Blue Cord
White Bias Ribbon
Anita's Jingle Bells from Docrafts


Thursday 31 October 2013

Mother Daughter's Sister's Prima BAP October 2013

This is my October Prima BAP Sketch Challenge.

I really loved the look of the sketch so I did it as closely as I could.  I'm happy with how it came out but it isn't totally me.  I'll work on it some when I'm hit with a moment of inspiration in the future.

Supplies
Prima Flowers, chalkboard, pink edger, prima labels (Firefly, Lyric,) Sunrise Sunset Cardstock, Delight Cardstock, Stencils Finnabair Elementals Bubbles 12 x 12, Butterfly 12 x12, Vintage Vanity Doily 6 x 6,
22guage wire, seed beads from my stash
Lindy's Stamp Gang starburst colours
My Craft Studio fine white glitter
Cosmic Shimmer Gilding Wax Silver and Plum and Gold
Molding Paste from CardznScrapz Shop
Luminarte Primary Elements from CardznScrapz Store

I spilled some red ink onto my wedding dress in the photo so I covered it in lots of glitter and I love how that mistake brought about the most favourite part of the layout for me.

The 2 labels behind the photo actually pull out and I wrote a few private things about how I felt that day.


That's All for Now
Hugs
Celina


Wednesday 30 October 2013

Wedding Card

This was a card my Auntie Rosie asked me to make for her son's wedding.  Stephan and Michelle are both in the merchant navy, so she wanted something elegant and in blue and white and their names on it.  She also asked if there was anything that I could do that reflected their careers.
 

Ahhh,  a Challenge!!!

This is what I came up with let me know what you think.  My Auntie loved it and so did Claire so I very happy as it was a card for a very important occasion.


The wedding was great and everyone had fun.  Michelle's dress was stunning and she beamed from ear to ear all day.  With the recession and most of us having to immigrate in order to work and having over 40 first cousins, we only ever get to meet once in a blue moon.  That makes the day more special, I think.

Supplies I used;

White Centura Pearl Card
Navy Centura Pearl Card
Acetate with the Caught in Crystal Technique
Adirondack Alcohol Inks
Memory Box dies
1. Gothic Grand Arch,
2. Gothic Grand Stained Glass Window,
3. Grand Iron Work Window, and
4. Alphabet letters Lower and Uppercase
Navy cord (from my own stash)
Spellbinders Small Fleur de Lis Rectangle.
Creative Expressions stamp quote.
Cosmic Shimmer White Embossing Powder

I think this is another card that would work for Christmas or any other special occasion.

That's All For Now
Hugs
Celina

Wednesday 16 October 2013

12 Tags of 2013 October

Once again it's another Tuesday and as I was going over new posts from my favorite blogs I came across Tim Holtz.  I saw his October tag and he made it look really easy so I thought, why not?


All I had were his distress inks, distress glitter (Black Diamond & Clear Rock Candy) and nothing else.  As it's about technique not products I thought just this once I'll give it a go.  I can use something similar and try and get a similar look if nowhere near accurate!!  I needed Distress Ink (I had that) Distress Glitter (I had 2) Distress Paint (I substituted Acrylic paint), Archival Ink (I had that) Bigz Dies (No luck there. I had Spellbinders Halloween ones though), some  Ribbon and Rangers Clear Glossy Accents.

I started off well enough. I used the dies to cut out a graveyard scene, a flying witch and a spider which I covered in Glossy Accents and smooshed it with my finger and poured Black Diamond Dry Glitter all over it. I left them under the mountain  of glitter for a few minutes and resisted the urge to pat the glitter down and then cleaned up the mess and put those pieces to one side. Now I went a small bit off course (later I went off planet, never mind Off Course!!!!)  


I didn't want to use the Black Diamond Dry Glitter again because I wanted to have a stalagmite/stalactite calcified impression to the gravestone strip so it would give this part of the tag a decayed mouldy look that I think came out better than I thought it would.  I was quite shocked it turned out so well because I was absolutely convinced it was going to go in the bin.  I painted it in purple let it dry and covered it in purple fine glitter (accidental) and thought I'd try and save it so I covered it again in glossy accents and put Rock Candy dry glitter all over it.  I let it harden a little, I sprayed Glimmer Mist Blood Red (I think?) from Tattered  Angels generously and put it to one side all the while praying to the Divine Artist that I wouldn't have to do a do-over on that piece again LOL!! 


Next the tag itself. I didn't have a big big one so I cut out a Size 10 one myself from a 21cm x 10.5cm.  I poured a little Golden Flow Improver and Golden Fluid Acrylics Iridescent Gold, Ultramarine Violet, Hansa Yellow and Vat Orange. I spritzed them with water and swiped the tag through them in different directions. I dried it a little with the heat gun and spritzed the tag with water and soaked the excess with a kitchen towel. I dried it completely once I was happy with the marbelizing effect on the tag.

Dry, I inked a script stamp from IndigoBlu with black Archival (Ranger) and because I didn't want a uniform, perfect impression on the tag I placed the stamp down without an acrylic block lifting it off and down here and there on the tag.  


Dry, I saw that it really wasn't spooky or grungy enough so I thought, for a moment, about what to use to give it a worn and almost grimy appearance (brassy, just like I had always imagined the silver and cutlery in Ms Havisham's dining room from then fantastic book, Great Expectations by Charles Dickens).  I wanted a real worn foil effect to make the tag look old, decayed and tarnished.


So I applied some IndigoBlu Flake Adhesive on some cut'n'dry foam and pounced lightly all over the tag and put their Yorkshire Dales Flakes and scooched it off. Normally I gently rub the flakes off but to give it a really worn matte effect  I rubbed much more off and repeated the process with Sheffield Steel flakes.  

That done, I aged it more with drops of ink and let it run down the tag a little and dried it off until I was happy with the overall look.  

As I had a spider die-cut I wanted to give him a cobweb so I used the one from Spellbinders.  As it's detailed I put wax paper closest to the die and when I popped the 1st one out I loved the way the wax paper looked as well so I repeated the same process to more times and l glued the wax paper to each cobweb piece slightly off setting them.


Next came the putting it all together stage (my favorite part).  I glued the 1st cobweb and put it on the upper left corner. I threaded the spider body so that it would move on its own.  The next cobweb I put on the lower right side and then adhered the graveyard strip on top.  Once that was dry I put the last cobweb on the right of that so it looked like an uneven spooky web.  I used black foam pads to stick the flying witch off the tag and then aged a Happy Halloween Label to the middle of the tag and finished it off with ribbon that I coloured with ink and scrunched it up and it looked as if it had been soaked in real blood, and then dried it and threaded it through the eyelet of the tag.  


I had so much fun that, I've ordered lots of Tim Holtz products and bought his online Chemistry 102 course.  I think he is a visionary and a genius when it comes to all things artistic and crafty in this world.  Some day I'd love to meet him and learn from him in person, or at the very least see him in CHA (even though I don't have a shop!)

Hugs for now and I'll post again next week!!

Celina

PS : everything in this post I purchased from Cardz and Scraps, Create with Kate or ebay

Tuesday 8 October 2013

Clodagh's Confirmation Card

Hi Everyone,

I know that this year's Confirmation season is long since gone but I was looking over projects I had done but not posted when I found this one. 

Here in Ireland we take Communions and Confirmations very seriously and the cards given should reflect this.  Normally I would make something really outside of the box but this was a commission so I went with what Bridget wanted for her niece.  In this instance Bridget is very reverant and loves her faith and loves her church.  Her family are incredibly devout and the card represents that.

I started with beautiful White Centura Pearl Card from Crafter's Companion which I embossed with the Couture Creations Tied Together embossing folder and cut out a Memory Box Cathedral Window. 

I cut an Arch from Memory Box dies from a caught in crystal piece of acetate that I had made a few months earlier with my little girl.  I layered the pieces and it gave the effect of a wonderfully delicate stained glass window.

I mounted stuck it all together mounted on foam pads and then for a feminine look I added an Acetate Butterfly from Hunkydory and Swirls from Prima and spelled out Confirmation in silver peel offs letters.

I layered it with Silver Mirri Card and Attached it to a 8 x 8 card made with white Centura Pearl.

Finally I put Black Dazzlers from Creative Expressions to complete the whole thing.

I think that the Memory Box Window Dies are gorgeous and are fantastic for any sort of celebration card from weddings to Christmas.

That's all for now. Hope you have a great week.

Celina


Saturday 28 September 2013

Finnabair Inspired Journal Cover & Bookbinding!!!September Prima Challenge BAP

I know that it has been a very long time since I posted anything here so I aim to do weekly posts from now on.


Last Sunday I along with about 30 other crafty minded people had an amazing time learning new techniques from the fabulous Anna Dabrowska aka Finnabair.  This was my second year learning from her.  She really is gifted. 

CardznScrapz did an amazing job organizing and hosting the day so hats off to Rosary and Lia for all their hard work. I'm sure that everyone in their team were involved as it was a tremendous day and the shop was diverse and well stocked. Needless to say this hurt my credit card (I'm almost certain I saw tears in my husband's eyes when he left) as I picked up a staggering amount of Prima stock that I absolutely had to have!! (When I got home, I realised, that was not the case at all).

It was fantastic!!

Now, one of the classes involved was learning how to do a canvas collage which was something I had never done  before so, when I got home that night to Waterford, I couldn't wait to do another one.

I thought well, what can I do this technique on that was not wall art yet sturdy enough to be a similar project?  I know, I'll make a journal cover and I will make a Coptic bound book out of it.  Woo Hoo!!!   


That is exactly what I did.

I covered a piece of mountboard and chipboard with canvas and it measured 25cm x 25.5cm

I glued everything together and folded 40 A4 sheets to A5 and made 10 signatures and once the cover was complete I sewed it all together.


In respect of her wishes I won't tell you how to do it and how I did this but I will tell you about the little extra touches I did to make it more personal and more Me! LOL!!!


I added lots of molding paste to the lace and ribbon and created texture with lots of the new Elementals Stencils by Finnabair (naturally) from Prima Marketing.  I also used, almost exclusively their wooden Icons and Junkyard findings.


I had taught my 6 year old daughter, how to do the 'caught in crystal technique'  with tissue and acetate and then die cut the smaller Jewel Goddess from Spellbinders out of it.  I let the purples and reds guide me in the colors of Luminarte sprays and silks I used. 


The letters were done with the Martha Stewart White Clay and alphabet molds. I didn't want it to look all even and symmetrical so I glued the letters on  slightly wonky as I wanted it to look a little more grungy. Here in Ireland you can get it online in CardznScrapz(follow the link above).  If they run out they will source more for you if you request it. 

Finally I highlighted a few areas with different gilding wax colours from Cosmic Shimmer from Creative Studios UK I wasn't able to find waxed thread so I made my own with a lovely lilac skein of embroidery thread and bees wax I got from Grubbs Framing here in Waterford City.

 
I love how all this turned out and it really challenged me to look at my projects in a completely different way.


Thursday 11 July 2013

My First Post Ever

My first ever post. AAAHHHHHH!!!!

My name is Celina and I live in Waterford the 'Sunny South-east' of Ireland (which means it only rains 350 days of the year instead of 360 LOL)

If you had told me only a year ago that I would be making nice things that people would pay for,
using art techniques and all things crafty I would have laughed you out of the house!

I was even told at the tender age of 14 that I should concentrate on other school subjects such as science or English literature as I had no artistic talent or vision to speak of.  I must admit I agreed with them at the time.  I didn't like what she said, but she was right, I couldn't draw or paint anything except floors, walls and ceilings, Ha-Ha-Ha.

Fast forward umm.... a few years and I was pregnant with my second child. I was put on bed rest very early into the pregnancy and my husband and I had been warned that Alex would be born quite premature and to prepare for the worst and hope for the best.

Between our fears and our tears, I found something that day and it changed the course of my life!!!
Create and Craft TV.

Not sure what to get I saw a Spellbinders machine being advertised with some dies and thought wow that looks so cool!!

But I waited and watched a few more shows and thought it looks so easy and I got one on flexi-pay and waited for it to arrive.  By the time it did arrive I had bought lots of little things like paint, inks, embossing powder and well anything that looked remotely fun and easy to do.

Needless to say that what I first made was well.. crap! Until I came across a few blogs and then things got interesting.

Through trial and error I began to create and design things and cards that were at times really pretty and at other times masculine. 

So here I am terrified of showing what I can do when I don't know if anyone will like it. Then again I am doing this for myself so I really don't know how all this will turn out.

Here are a few pictures of what I have done so far and feel free to comment but don't be too hard on me and instead suggest how I can do things better.


This is just some of what I've done from last year and as I wish to improve (or evolve) I aim to show you something I have just done be it journaling, cards, mixed media or anything else I want to try and do.  I will show you as we go on this wonderfully crazy journey.  I will do it at least once a week and see how it goes.

I hope you like what I do and how I tell the story.
Thank you for reading, or skimming, or just looking at the pictures LOL!!

Celina

Goth Girl's Goth Birthday card

Hi Fellow Crafty Artists!!

It's a card today for my little show and tell.


I was commissioned to make this for a 12 year old goth birthday card for a girl!!  Let me tell you what a challenge it was to come up with something not too risque but embraced her inner creative spirit.

I loved this card making process.  I found  what I was looking for on KennyK downloads.  I love the selection of digistamps that they have and their Gothic Angelz are so cool!!  I downloaded a few of the collection and decided that the best and least risque was 'Kitty Catastrophe'.  
Although the stamp shows a bare midriff I coloured it with my Copic Markers and made it look like a complete top in purples and blacks and I coloured in the fishnet stockings into striped stockings. I loved the whole biker grunge gorgeous girl it turned out to be.

Clodagh hated pink and so to make her a little softer I coloured the hair in very dark blue/black and purple streaked hair. I highlighted what seemed like ribbons to me in Sakura black glitter pen to highlight them.

For the background I printed off some crafters companion CD rom a tartan pattern in purple and black and cut two Scalloped Rectangles from Spellbinders and punched and inserted eyelets all the way down on both sides and threaded black cord for a laced up effect.  I used Black Soot and with my Splodgeaway blending mat distressed the piece to make it a more used and grungy look to fit in with the digi-stamp. 

I embossed some centura pearl black card with the Spellbinders Reverence M-Bossabilaties folder and matt and layered it with Purple Centura Pearl Card and Black to finish. 
I cut out the Digi-stamp with Spellbinders Label 25 (I think?), and while it was in the die I distressed it around the edge with Distress Ink 'Dusty Concord'. When I Took it out of the die I noticed it was slightly smudged so I used a quick dry glue pen around the edge and applied black glitter to it.

I stamped a Creative Expressions Sentiment on black card with Versamark Frost ink pad and embossed with white powder from Cosmic Shimmer. I cut it out with Spellbinders Fleur de Lis and attached it the the upper right side. I applies 4 small Lavender Dazzlers. 

On the Right side of the card I applied the laced-up tartan and tied a bow with Kanban web mesh which I had died black and allowed to dry overnight. Do not try to use a heat gun to speed it up as it will burn and melt. Ilearned tha the hard way LOL!!


I put a matching Large Dazzler on top.  On the Left I affixed the Digistamp and voila! a card was made.  I love the way it turned out!!

Hugs
Celina XX

Wednesday 3 July 2013

Altered Photo Frame Gift

Thank you Ms Caffrey!!!


My daughter started her summer holidays on Friday. Saoirse positively blossomed in her care and as we are told not to buy gifts, I made one instead LOL.


I must admit I was delighted with the results!!
But first let me tell you a little about Saoirse's amazing teacher who inspired me to create.  I don't know Miss Caffrey on a personal level as is right I think. Saoirse thought the Sun, moon and stars shone because of her.
She cares about the children in her care. She is patient, supportive and inventive in her different attempts to educate the girls to the best of her ability.  She worked with me and educated me in the best way to bring on her reading and writing and sums.  I felt like I was part of a team. Because of this Saoirse caught up with her classes in everything.  So much so that she got a certificate for being the best at writing.  Amazing.
Saoirse struggled because she got a teacher last year that was the antithesis Ms Caffrey.  I know that from now on I'll compare all of her subsequent teachers to her.

Ms Caffrey strikes me as someone who is feminine without being too girly, and elegant but strong and confident.  

I could work with that I thought, and as we are not allowed to buy gifts for the teacher, I'd make one instead.

This is what I came up with!!


I had a great time creating this. 

I pasted Kaisercraft cardstock to the whole frame and let it dry. Then using a Prima stencil I applied pearlesent past and let it dry.  


Once I liked the overall effect and then started on the focal points.  I used Spellbinders LF-013 Jewel Goddess dies to cut out 2 small and 2 large forms in Chipboard and Kaisercraft cardstock. I glued the layers together and once dry I cut out 1 small and 1 large double-sided adhesive sheets and then poured Creative Expressions Medium Glass Beads.


I inked up Prima resist flourishes in Ranger Stream inkpad and applied a metal flower and Dazzler on the larger Goddess and the smaller flourish and wooden butterfly from Prima and a crystal to finish.

Finally I added a lot of flowers and embellishments from Prima to the opposite corners and found the Bulb Trinket embellishments which best described Ms Caffrey in my mind Inspire and Love.


It is very easy to crush a child's spirit but a truly gifted teacher shows how to make her soul to soar with gentle but firm affirmations and encouragement. 

That's all for now.
Tell me what you think, if you can please.

Hugs
Celina xox