Monday, 11 August 2014

Scraps of Elegance July Inspiration Board Challenge


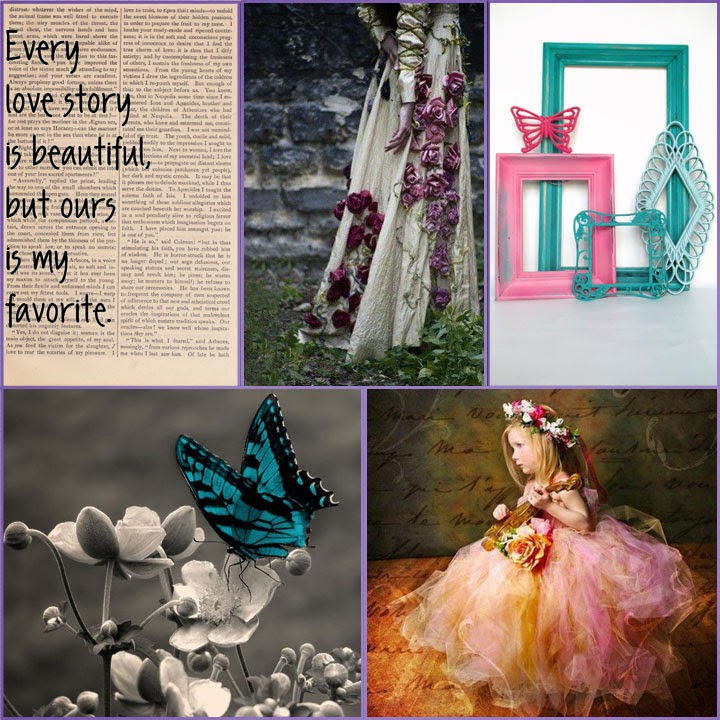
For July Melinda decided that an inspiration board would be the challenge for this month rather than the usual sketch for Scraps of Elegance


You can find the kit listed here and a description of all the products used.


Other Supplies Used

Elizabeth Craft Designs Silk Glitter
PaperArtsy Grunge Paste
Golden Extra Heavy Gel Medium (matte)
Tim Holtz Dies Ornate Frames, Courtyard, Lattice
Tim Holtz Distress Ink Walnut Stain
Tim Holtz Stars
Inkssentials Crackle Accents
Inkssentials Glossy Accents
Cosmic Shimmer Hologram glitter
PaperArtsy 9" x 11" stencil
Prima Butterfly Stencil
Prima Resin Frames
Fabscraps Die cut shape (Forever and Always)
Lindy Stamp Gang Hydrangea Blue Mauve embossing powder

I used the IB panel 3 had different frames and I cut out 2 from the Sizzix Ornate frames and applied glossy accents.  I accented those with a Prima rsin heart frame and embossed it with LSG desert moon turquoise


The first IB panel is focussed on the phrase so I used this one from Fabscraps and embosses LSG embossing powder in 2 layers to build it up and give it a great shine
The butterfly on IB panel 4 is shown in a few ways. I used the Prima Butterfly stencil with Golden extra heavy paste and put fuchsia silks glitter on most of them and Cosmic Shimmer Iced Snow on the rest.  I used the same colour on the board and put it in the glitter on the grunge paste on the circles.  I used the dark gray from the IB as my scrapbook page.  I used the reneabouquet butterfly as an accent.
On the last IB panel the little girl is wearing a crown of pink flowers which I put on the bottom right.  I also thought it looks aged so I used the clock charm to accent it.  I used the Prima Chalk pink through a paperartsy stencil.  I used the courtyard die to cut out all circles (like a crown)
I really hope Melinda keeps the IB panel because it works so much better than a sketch and most of us show much more than a sketch piece on the forum/community.

Tell me what you think

Hugs


Monday, 28 July 2014

Tim Holtz 12 Tags of 2014 July


 Excerpt from Edgar Allan Poe poem

The Raven

(Once upon a midnight dreary, while I pondered weak and weary,
Over many a quaint and curious volume of forgotten lore,
While I nodded, nearly napping, suddenly there came a tapping,
As of some one gently rapping, rapping at my chamber door.
`'Tis some visitor,' I muttered, `tapping at my chamber door -
Only this, and nothing more.' .....

.....
But the raven still beguiling all my sad soul into smiling,
Straight I wheeled a cushioned seat in front of bird and bust and door;
Then, upon the velvet sinking, I betook myself to linking
Fancy unto fancy, thinking what this ominous bird of yore -
What this grim, ungainly, ghastly, gaunt, and ominous bird of yore
Meant in croaking `Nevermore.')

This is Tim Holtz Tag for July if you just follow the link


This was a tough technique for me today because I thought my lovely Big Shot Pro machine was going to break trying to emboss construction acetate (I didn't have Shrink film to hand)!!! Honestly I don't know why it didn't break!!

I have been trying to do his tag techniques in a way that makes my own appear pretty.  That's why I loved his June Tag so much.  But, I didn't do all the steps since I only wanted to do what would make something appealing. 

That is my comfort zone.  And I need to be pushed out of it.  Pretty is what I love, however, I think that's making me far too rigid in my arty expressions so I'm going to push my boundaries creatively and enjoy learning and executing new instructions.

So this time I was much more careful to follow each of the steps.


I am subscribed to Melinda Kelly's Scraps of Elegance and Scraps of Darkness scrapbooking kits, and her SOE kit for July is all about Marion Smith Designs, Mad Tea Party.  That is when I thought about the Mad Hatter's question from Alice in Wonderland "Why is a raven like a writing desk? That thought led me to the raven from Edgar Allen Poe and the word "Nevermore" and I knew what I wanted my tag to have.


That one word "Nevermore" scared the holy moley outta  me when I was really young and I'd come across poem.  I am aware now that it is about loss and the depression felt by those left behind and I believe for different reason why this poem is still able to scare me.


Supplies
TH Writing Desk Bigz Die
TH Raven And Scaredy Cat Bigz Die
TH Cobweb Decorative Strip
TH Movers and Shapers Die - Mini Bat and Skull Set
Graphic 45 Nevermore (Steampunk Spells)
TH Distress Paint Seedless Preserves, Black Soot, Tea Dye, Walnut Stain, Faded Jeans, Old paper, Dusty Concord,
TH Distress Stain Faded Jeans, Seedless Preserves,
TH Distress Ink-pads, Tea Dye, Walnut Stain, Black Soot, Picket Fence, Old Paper
TH Distress Pen Seedless Preserves, Black Soot, Faded Jeans
TH Spritzer
TH Grungeboard
TH Cracked Embossing Folder
TH Word Band
Clear UTEE
Adirondack Red embossing powder
Glossy Accents
Distress Glitter Rusty Hinge, Seedless Preserves
Construction Acetate
Size 12 Manilla Tag
Eerie Graphic 45 Cardstock
Black Ribbon
Crackle Accents
TH Staples/stapler
Golden Gold imit paint
Black Cardstock


Well I hope you like it and tell me what you think.

Hugs

Celina

Friday, 27 June 2014

Kathy Orta Organizer with SOE Bo Bunny Papers!

I started out with the idea of making this Organizer following Kathy's tutorial videos and she made it so fast (seemingly) but OMG was it a real trial for me LOL!! 


 Back                           Side


It's a gift for Saoirse's teacher because she and the school have been amazing since Saoirse has been dealing with her serious eye problem.  Ms Hackett and the entire staff of the Our Lady's of Mercy Primary School here in Waterford City Ireland have been fantastic and really are the ideal for what teachers and school should be.  We are planning to move to the UK in the next few months and I'm going and I wanted to show them how much I appreciate everything they did for her.


Thank you all.


You can find a video here about what I did and to show how it looks


This is my very first Youtube Video!!

http://youtu.be/ObSNe3OO2GE
It's amazing how well she is handling everything and it just goes to show how resilient children are no matter how difficult things are for them.  I am so so proud to be her mother! :) <3 even when she is being a brat or won't go to bed LOL!!


Anyway as she had lost over 50% vision in her left eye so suddenly the school bent over backwards for her and us.  Ms Hackett and her Principal Mrs Brick did everything that they could to make sure Saoirse didn't fall behind because of being off sick for so long.  Their support really blew us both away.  I must admit when we went to the school initially, to inform them about what was happening last September that I will say I cried a little because they made us really feel we weren't alone during this difficult time.  Because Ms Hackett worked with us Saoirse didn't get lost in her work or feel too different from her friends. This was so important for a 7 year old.

I wanted to do something special for Ms Hackett and because we can't buy anything, I made this instead, and, it took much, much, longer than I thought.  I just wanted to get it right!  School finishes tomorrow


I'm not going to say how I did it (it's against the rules) you have to get it from Kathy's site or Youtube.


Supplies

Bo Bunny Primrose Collection (Scraps of Elegance April)
Bo Bunny Primrose Ephemera
Creative Expressions Self Adhesive Black Pearl Swirl
Fab Scraps Oriental Catch Embellishment (Scrapadapadoo)
Prima Resin Butterfly
Paper Accents Brown, Beige, Green, Deep Pink Cardstock 12 x 12 (Scrapadapadoo)
Prima Free Spirit Paperclips
Prima Cartographer Paperclips
Prima Free Spirit Silver Clips
Prima Free Spirit Brads
Prima Seashore Brads
Tim Holtz Distress Ink Pads Picked Raspberry, Mowed Meadow, Victorian Velvet, Aged Mahogany.
Miracle Tape 3/8"
Scor-Tape 1/4" and 6" and 1/2"
Scotch Quick Dry Glue
Scotch ATG Gun
Beacon Quick Dry Superglue
12 x 12 Chipboard
Buttercream 1mm Kumihimo Cord
We R Memory Keepers Corner Punch (Green) Deco/Stub

I really hope you like and comment on this post.

((Hugs))

Celina

Friday, 6 June 2014

Tim Holtz 12 Tags of 2014- A Technique That's So Much Fun for the Month Of June!!!

This is the technique that Tim Holtz posted for his 12 Tags of 2014 for June.

Normally because of the inclement weather I usually have to edit the dull look of the pictures.  Not This Time!!!  Yesterday the sun shone (I know it seems weird for Ireland), so all I needed to do was crop the photos. That means what you see here, is how vibrant and summery it truly looks!! I kid you not LOL :) 

I loved his tutorial so much that I've made 4 no 5 more tags of yummie-ness now!!!

To do this technique click on the 12 Tags link I've made above and it will go to Tim's blog where you can emulate him and post your own fab creations because it will give you fantastic results!!

It's essentially a watercolor letterpress technique and so simple that it's GENIUS!! 


Supplies

Wood-mounted Tim Holtz Change stamp
Tim Holtz - Stampers Anonymous Papillon
Tim Holtz - Distress Ink Pads - Mini Kit One (Picked Raspberry, Mustard Seed, Peacock Feathers & Spiced Marmalade)
Tim Holtz - Layering Stencils - Rays
My Stash Buttons, Metal flower
Junkyard Findings
Prima Resin Butterfly
Smooth Watercolour Cardstock
Kitchen Towels (to soak up excess liquid)
Scraps of Elegance Scrapbook Kit Club Clear drops & Hat Pins
Prima Large Clear Pebble
Foam Pads
American Seam Binding Ribbon White
Watermister
Beacon Quickgrip Clear Glue
We R Memory Keepers Corner Chomper Green Deco/Stub 
Tim Holtz Watercolor Fine Detail Waterbrush
Ranger Heat Tool
Ranger Black Archival Ink Pad
3/16 WRMK Big Bite Punch and lilac eyelet


When I did this technique, it didn't take long at all.  The most important step, is to thoroughly dry, the watercolor card, with a heat tool.

As the distress ink pads have to be applied to the reverse side of the stencil directly, it works best with the mini ink pads as more color can be applied to it and then spritzed with water and applied to the cardstock.  I have used the larger ink pads to bigger stencils with good effect.

I love vibrant colors like those in 'Mini Kit One', which naturally, was the first set I bought and the results were wonderful I think.


I used the Papillion Stampers Anonymous Butterfly Stamp, but because I didn't have the one that can be used with the Framelit Dies, I had to fussy cut them individually after I'd watercoloured them as per Tim's instructions.

The butterflies had been stamped onto the smooth watercolour card itself and the cut out ones mounted on double-sided foam pads to give it plenty of dimension.


I stamped the Change sentiment as well as all the other stamping with Black Archival Ink and heat set it so the watercolouring wouldn't bleed the stamped images

I thought that because have to go through a metamorphosis and emerge anew. 


I had lots of fun searching through my terrifying stash (some say trash.  I say whatever!!) to add the finishing touches to my tag after the corners had been chomped off by my WRMK Green CC on the Deco side.

I am not sure what the metal pieces came from (at least 1 is a Junkyard Finding or Finnabair cog maybe) and then I used the Large Clear Pebble from Prima.

The smaller pebbles are part of the Scraps of Elegance Kit for this month (more to follow with that kit Woo Hoo!!

Then the hat pins actually came from the Scraps of Elegance Flutter April Kit from which I snipped the off the sharp needle-points 
To finish I pressed all the mini distress ink pads that I used and spritzed generously with water and then dragged a long ribbon through it and then dried with my heat tool (Ranger of course LOL!)

Be sure to check out Mr Holtz blog (follow the link at the top of this post) and try out this technique for yourself with all the stencils and inkpads and glorious funness you have to play with and see how something so simple is so wonderful and creates amazing results.

Tell me what you think as I love reading comments.  It means I'm getting better at what I'm doing.

Hugs for Everyone,

Celina

Sunday, 25 May 2014

SOD Stationers Desk Large Tag May 2014 Facebook Challenge

I saw a post on Facebook about making something using a dressform (Tim Holtz die I believe) and if you didn't have the right die anything would be really ok as an alternative.

I'd made this tag which actually started off as a bookmark, magetized and everything, then it morphed into something else as these things always end up doing (everyone can relate right? :) )


  • 5 double sided papers from Prima's Stationer's Desk Collection
  • 5 double sided papers from Prima's Cartographer Collection
  • Prima: Stationer's Desk Collection - Pencil Flowers
  • Prims :Everyday Vintage Paintables 
  • Prima: Cartographer - Type Keys Clips
  • Prima: Ingvild Bolme - Mannequins
  • Ranger: Liquid Pearls - Copper
  • 1 Floral Bronze Metal Embellishment
  • Martha Stewart Circle Edge Punch Cartridge - Flower Arches (my stash)
  • DIY 3 x 4 Chalkboard Sheet (my stash)
  • Prima Stationers Desk - Tag Me - Ticket and Tag Set
  • Small Office Hinge Clip (my stash)
  • Tim Holtz Distress inks  Weathered Wood, Red Brick, Frayed Burlap, Old Paper (my stash)
  • Creative Impressions - Antique Ruler Twill Ribbon   


As you can all see, Melinda really delivered on a kit (I've said this a few times already I know!! LOL) that is so versatile.

I already had this made so I knew I would be able to post it in by the deadline.  I not sure if I like how it turned out.  I used everything except the chalkboard which, can be swapped for something else as the brass flower is actually adhered to an office hinge clip that I had in my stash.

I started off using a size #10 tag I believe and used the Stationer's Desk Red Romance and cut the paper down to size and distressed it by wetting it slightly and crumpling it up over and over and then ripped into the edges and opened it out and glued it to the tag.  Then I inked the edges with the Tim Holtz Distress ink (LOVE LOVE LOVE his genius!!!!) and put the twill ribbon under the cardstock and then inked that with some frayed burlap ink to age it too.

I put the wonderful big flowers bottom left and upper right that came in the kit and only stuck the bottom half and upper right of the flowers to the paper so the Paintables which I coloured with my distress markers Red Brick and Pine Needles a little.  Then I put the coloured image between the flowers and then used the Type Keys Clips and Stationers Desk Tags and Tickets and placed them around the paintables. Then I used the Martha Stewart French Scroll Punch with some of the Red Ink cardstock and applied it between the tag and red cardstock.  Used some Weathered Wood Ink to the edges of the punched out cardstock.  I put the mannequin piece from the kit on the top left and then thought it only looked ok.  Certainly not the best thing I've ever done and left it alone to wait for inspiration.

Later I realised that I needed to make another layer and see what would happen (I'm not a tag making sort of person.  It's a real crap-shoot how it turns out! (& no I've never played craps but I have seen Guys and Dolls loads of times and like the song 'Luck be a Lady Tonight') I love that movie!! :)

I used the Cartographer Faire un Voyage and used the Martha Stewart Flower Arches Cartridge and cut an 8" circle and then inked the edges with Frayed Burlap and Folded half to the front and glued the back.  I put tiny little dots of the Perfect Pearls Copper strategically as accents and then using the packaging from the Tickets and Tags and Used the WRMK Deco corner chomper punch side and then inked the edges and stuck on to the front of the circle.

Then I got the the Brass Flower and glued it to a small Hinge clip and Glued it to the top of the Deco cut piece and finally I got to finish it up using another piece of the resin corset and put that on the lower left and used some more of the tags and type keys to complete it.  After it was all done I used white chalk and scribbled it over the 3x4 chalkboard and then wrote Dress up time!!!  Fun Fun Fun

Hugs for Everyone

Celina

Wednesday, 21 May 2014

Scraps Of Darkness 'His and Hers' April Kit Kathy Orta Paper Phenomenon Faux Paperbag Album

  • 5 double sided papers from Prima's Stationer's Desk Collection
  • 5 double sided papers from Prima's Cartographer Collection
  • Prima: Stationer's Desk Collection - Pencil Flowers
  • Prims :Everyday Vintage Paintables 
  • Prima: Cartographer - Type Keys Clips
  • Prima: Ingvild Bolme - Mannequins
  • Ranger: Liquid Pearls - Copper
  • 1 Floral Bronze Metal Embellishment
  • Martha Stewart Circle Edge Punch Cartridge - Flower Arches
  • DIY 3 x 4 Chalkboard Sheet
  • Prima Stationers Desk - Tag Me - Ticket and Tag Set
  • Small Office Hinge Clip (own stash)
  • Antique Bike Charm
  • Wrights - Ivory Bead/Sequin Wedding Embroidery Lace
  • Creative Impressions - Antique Ruler Twill Ribbon 
  • Heavy Weight Chipboard Sheets  
  • Tim Holtz Distress Ink Fired Brick, Weathered Wood, Black Soot, Old Paper, Frayed Burlap
  • Martha Stewart Punches
  • Core'dinations Black and Red cardstock
  • Lindy's Stamp Gang Starburst Spray Frozen Jack Frost
As I've said before I have been taking part in Kathy Orta's Digital/Everyday Kit Club and loving every minute of it!!!

This album is actually one of her older ones and I made it this way because I didn't have access to paper lunch bags here in Ireland.  I searched everywhere and finally sourced my own but as I'd already started this and I was under a deadline I finished this one and as it was for someone in her mid thirties and Italian.  When I met her I thought she was cultured, well read, intelligent, elegant and refined.

So I instantly went to this kit collection because I love this palate in papers and embellishments.  They were perfect!!!  Once again let me say that Melinda struck the scrapbook kit ball out of the park!!! Fab!! Fab!! Fab!!

So I can't tell you how I made but Kathy's hidden hinge binding is easy and really clever.  But I used LSG Frozen Jack Frost to dye the lace to the blue/gray that matches the blue/gray in some of the Prima cardstock


Iadded some of my own embellishments strategically so there was no gluing any pictures and move them around as much as she likes.  I actually didn't completely add all the embellishments because I thought she would enjoy doing some of the fun herself.


Let me know what you think.

Hugs

Celina