Tuesday, 14 January 2014

Lindy's Stamp Gang January Colour Challenge

This is my entry for the January colour challenge.  
I thought it looked drab and for a few days I was not going to do an entry.  That is until I remembered the Once Upon a Time series specifically the Season 2 premiere where Aurora wakes up from her sleep.  I knew that my niece would love this theme and so I became inspired.  She is fifteen since the 9th and although I had given her money I decided to make her something as well.

I bought a wood hanger from CardznScrapz. Then I ran away with it!!

Viva Decor Graphite Ferro Paste  (a fantastic gritty structure) that dries quickly and can be painted and sanded and easy to use.

I painted it with white paint and dried it with a heat tool.
Then I got to work and as my three year old says "Oh! What Fun!!".
The fabulous products I used from Lindy's Stamp Gang are
Bodacious Blush spray and magicals
Gag Me with a Spoon Gray spray and magicals
Cleopatra's Copper embossing powder
Silver Moon Mistletoe embossing powder
Queen Sheba Silver embossing powder
Gag Me With a Spoon Gray and Bodacious Blush Glitter
Fusible Webbing which is really fun to play with.
Lindy's Stamp Gang Side Swirl Accents Large and Small (I love these as they are simple and aesthetically pleasing on any project.)
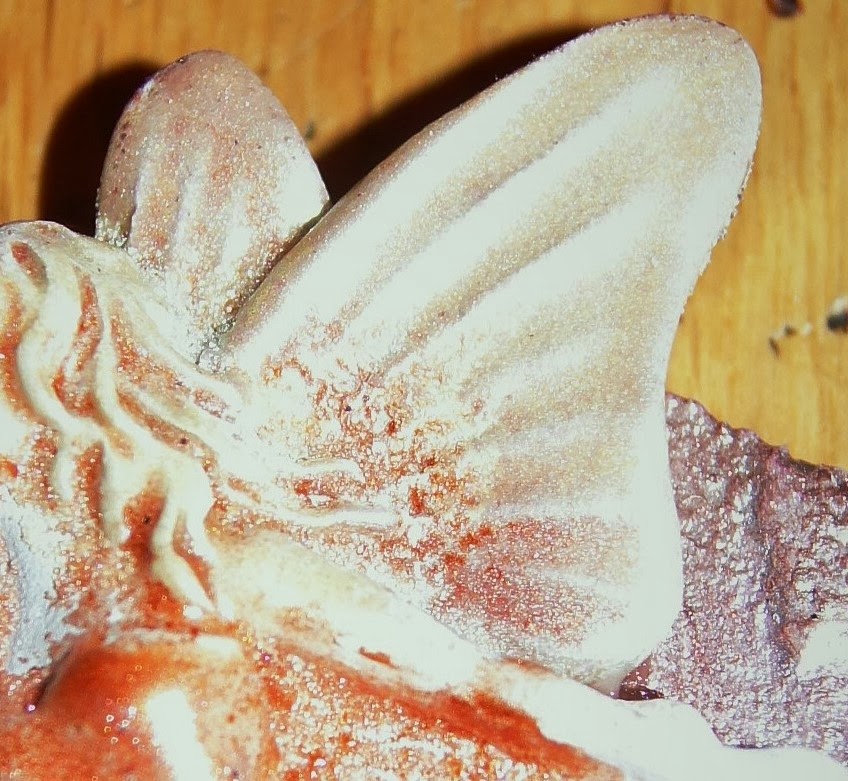
Prima Flowers and Resin Fairy
Versa Mark Frost Embossing Pad
Prima Brads
Prima Junkyard 

Memory Box Alphabet Dies Uppercase and Lowercase  

Golden Acrylic Paints for a base.

I painted the entire hanger white once the Ferro had dried. 

I painted it alternating between Burnt Sienna and Alizarian Crimson Hue and Gray made up of Carbon Black and Titanium White.
I painted up a lot of layers of Magical Gag Me with a Gray Spoon and Bodacious Blush which I had barely dipped with water. 

I layered the colours so many times that the colours became opaque.  Then to blend the edges I sprayed more of the colours all over. When it dried I put the webbing in a few areas and used the heat gun to make it look lacy (slightly) and put a little Cleopatra's Copper and Queen Sheba Silver and heat embossed it.
I put the glitter on the LSG accents and let them dry.


I sprayed and painted the Prima Flowers with the LSG sprays.
I layered them with the Junkyard Findings and brads and dried everything.


With the fairy I applied the Versamark pen and used the Cleopatra Copper for the dress. I embossed the wings with a tiny amount of the Cleopatra Copper and Silver Mistletoe.
I die cut the uppercase and lowercase letters and embossed with Silver Mistletoe and adhered everything to the hanger.
I think my Niece will like it.
I hope you tell me what you think, I would love some feedback.
That's all for now
((Hugs))
Celina

Tuesday, 24 December 2013

Lindy's Stamp Gang Drcember Color Challenge

Hi All,

It's getting very close to Christmas Day and I can't wait!!  We are spending it with my family in Cork this year.  My children are still little so I am looking forward to christmas morning and seeing the wonder in their eyes.  I think this is the most splendid day of the year.

998076_10151641662013863_2057963122_n

I was recently in Athlone with my two little monsters and husband to participate in a Christmas Jamboree party hosted by the fantastic Create With Kate (Walsh) at the Hodson Bay Hotel.  I had a lovely time but I wasn't able to really get stuck into the classes because my children kept coming in and wanting me to go with them for one reason or another.  (I'll be going on my own next time :) !!!)

One of the classes I tried to do was Martina Downes Tim Holtz Christmas Wreath Class.  I was in and out of the room so much I ended up takeing lots of photos and buying the supplies I needed afterwards from Create With Kate, Cardz'n'Scrapz, Scrapbook.com and especially Lindy's Stamp Gang for their incredible sprays. 

The LSG December color challenge is as shown above and I made this wreath based on the color scheme shown for a great friend Vicky.


I loved this color palette as all the colours are my favorites!!!


Supplies:-

Wooden Wreath from Penney's
Lindy's Stamp Gang Time Travel Teal Spray
Lindy's Stamp Gang Sweet Violet Purple Teal
Hunkydory Fairy Kisses Glitter
Ranger Grungeboard
Ranger Grungepaper

Sizzix - Tim Holtz - Alterations Collection - Bigz Die - Christmas - Holly Branch

Sizzix - Tim Holtz - Texture Fades - Alterations Collection - Christmas - Embossing Folders - Textured Poinsettia Pattern Set

Hot Glue Gun (essential)
Small set of battery operated fairy lights
Waxed thread to lace up skates
Flower Soft Snow (gives the blades of the skates the impression that the have ice shavings on them)
Kanban Snowflake Stickers
Viva Decor Silver Metallic Rub (to highlight embossed flowers and some areas of the wreath)
Rich Magenta and Teal Blue Cord
White Bias Ribbon
Anita's Jingle Bells from Docrafts


Thursday, 31 October 2013

Mother Daughter's Sister's Prima BAP October 2013

This is my October Prima BAP Sketch Challenge.

I really loved the look of the sketch so I did it as closely as I could.  I'm happy with how it came out but it isn't totally me.  I'll work on it some when I'm hit with a moment of inspiration in the future.

Supplies
Prima Flowers, chalkboard, pink edger, prima labels (Firefly, Lyric,) Sunrise Sunset Cardstock, Delight Cardstock, Stencils Finnabair Elementals Bubbles 12 x 12, Butterfly 12 x12, Vintage Vanity Doily 6 x 6,
22guage wire, seed beads from my stash
Lindy's Stamp Gang starburst colours
My Craft Studio fine white glitter
Cosmic Shimmer Gilding Wax Silver and Plum and Gold
Molding Paste from CardznScrapz Shop
Luminarte Primary Elements from CardznScrapz Store

I spilled some red ink onto my wedding dress in the photo so I covered it in lots of glitter and I love how that mistake brought about the most favourite part of the layout for me.

The 2 labels behind the photo actually pull out and I wrote a few private things about how I felt that day.


That's All for Now
Hugs
Celina


Wednesday, 30 October 2013

Wedding Card

This was a card my Auntie Rosie asked me to make for her son's wedding.  Stephan and Michelle are both in the merchant navy, so she wanted something elegant and in blue and white and their names on it.  She also asked if there was anything that I could do that reflected their careers.
 

Ahhh,  a Challenge!!!

This is what I came up with let me know what you think.  My Auntie loved it and so did Claire so I very happy as it was a card for a very important occasion.


The wedding was great and everyone had fun.  Michelle's dress was stunning and she beamed from ear to ear all day.  With the recession and most of us having to immigrate in order to work and having over 40 first cousins, we only ever get to meet once in a blue moon.  That makes the day more special, I think.

Supplies I used;

White Centura Pearl Card
Navy Centura Pearl Card
Acetate with the Caught in Crystal Technique
Adirondack Alcohol Inks
Memory Box dies
1. Gothic Grand Arch,
2. Gothic Grand Stained Glass Window,
3. Grand Iron Work Window, and
4. Alphabet letters Lower and Uppercase
Navy cord (from my own stash)
Spellbinders Small Fleur de Lis Rectangle.
Creative Expressions stamp quote.
Cosmic Shimmer White Embossing Powder

I think this is another card that would work for Christmas or any other special occasion.

That's All For Now
Hugs
Celina

Wednesday, 16 October 2013

12 Tags of 2013 October

Once again it's another Tuesday and as I was going over new posts from my favorite blogs I came across Tim Holtz.  I saw his October tag and he made it look really easy so I thought, why not?


All I had were his distress inks, distress glitter (Black Diamond & Clear Rock Candy) and nothing else.  As it's about technique not products I thought just this once I'll give it a go.  I can use something similar and try and get a similar look if nowhere near accurate!!  I needed Distress Ink (I had that) Distress Glitter (I had 2) Distress Paint (I substituted Acrylic paint), Archival Ink (I had that) Bigz Dies (No luck there. I had Spellbinders Halloween ones though), some  Ribbon and Rangers Clear Glossy Accents.

I started off well enough. I used the dies to cut out a graveyard scene, a flying witch and a spider which I covered in Glossy Accents and smooshed it with my finger and poured Black Diamond Dry Glitter all over it. I left them under the mountain  of glitter for a few minutes and resisted the urge to pat the glitter down and then cleaned up the mess and put those pieces to one side. Now I went a small bit off course (later I went off planet, never mind Off Course!!!!)  


I didn't want to use the Black Diamond Dry Glitter again because I wanted to have a stalagmite/stalactite calcified impression to the gravestone strip so it would give this part of the tag a decayed mouldy look that I think came out better than I thought it would.  I was quite shocked it turned out so well because I was absolutely convinced it was going to go in the bin.  I painted it in purple let it dry and covered it in purple fine glitter (accidental) and thought I'd try and save it so I covered it again in glossy accents and put Rock Candy dry glitter all over it.  I let it harden a little, I sprayed Glimmer Mist Blood Red (I think?) from Tattered  Angels generously and put it to one side all the while praying to the Divine Artist that I wouldn't have to do a do-over on that piece again LOL!! 


Next the tag itself. I didn't have a big big one so I cut out a Size 10 one myself from a 21cm x 10.5cm.  I poured a little Golden Flow Improver and Golden Fluid Acrylics Iridescent Gold, Ultramarine Violet, Hansa Yellow and Vat Orange. I spritzed them with water and swiped the tag through them in different directions. I dried it a little with the heat gun and spritzed the tag with water and soaked the excess with a kitchen towel. I dried it completely once I was happy with the marbelizing effect on the tag.

Dry, I inked a script stamp from IndigoBlu with black Archival (Ranger) and because I didn't want a uniform, perfect impression on the tag I placed the stamp down without an acrylic block lifting it off and down here and there on the tag.  


Dry, I saw that it really wasn't spooky or grungy enough so I thought, for a moment, about what to use to give it a worn and almost grimy appearance (brassy, just like I had always imagined the silver and cutlery in Ms Havisham's dining room from then fantastic book, Great Expectations by Charles Dickens).  I wanted a real worn foil effect to make the tag look old, decayed and tarnished.


So I applied some IndigoBlu Flake Adhesive on some cut'n'dry foam and pounced lightly all over the tag and put their Yorkshire Dales Flakes and scooched it off. Normally I gently rub the flakes off but to give it a really worn matte effect  I rubbed much more off and repeated the process with Sheffield Steel flakes.  

That done, I aged it more with drops of ink and let it run down the tag a little and dried it off until I was happy with the overall look.  

As I had a spider die-cut I wanted to give him a cobweb so I used the one from Spellbinders.  As it's detailed I put wax paper closest to the die and when I popped the 1st one out I loved the way the wax paper looked as well so I repeated the same process to more times and l glued the wax paper to each cobweb piece slightly off setting them.


Next came the putting it all together stage (my favorite part).  I glued the 1st cobweb and put it on the upper left corner. I threaded the spider body so that it would move on its own.  The next cobweb I put on the lower right side and then adhered the graveyard strip on top.  Once that was dry I put the last cobweb on the right of that so it looked like an uneven spooky web.  I used black foam pads to stick the flying witch off the tag and then aged a Happy Halloween Label to the middle of the tag and finished it off with ribbon that I coloured with ink and scrunched it up and it looked as if it had been soaked in real blood, and then dried it and threaded it through the eyelet of the tag.  


I had so much fun that, I've ordered lots of Tim Holtz products and bought his online Chemistry 102 course.  I think he is a visionary and a genius when it comes to all things artistic and crafty in this world.  Some day I'd love to meet him and learn from him in person, or at the very least see him in CHA (even though I don't have a shop!)

Hugs for now and I'll post again next week!!

Celina

PS : everything in this post I purchased from Cardz and Scraps, Create with Kate or ebay

Tuesday, 8 October 2013

Clodagh's Confirmation Card

Hi Everyone,

I know that this year's Confirmation season is long since gone but I was looking over projects I had done but not posted when I found this one. 

Here in Ireland we take Communions and Confirmations very seriously and the cards given should reflect this.  Normally I would make something really outside of the box but this was a commission so I went with what Bridget wanted for her niece.  In this instance Bridget is very reverant and loves her faith and loves her church.  Her family are incredibly devout and the card represents that.

I started with beautiful White Centura Pearl Card from Crafter's Companion which I embossed with the Couture Creations Tied Together embossing folder and cut out a Memory Box Cathedral Window. 

I cut an Arch from Memory Box dies from a caught in crystal piece of acetate that I had made a few months earlier with my little girl.  I layered the pieces and it gave the effect of a wonderfully delicate stained glass window.

I mounted stuck it all together mounted on foam pads and then for a feminine look I added an Acetate Butterfly from Hunkydory and Swirls from Prima and spelled out Confirmation in silver peel offs letters.

I layered it with Silver Mirri Card and Attached it to a 8 x 8 card made with white Centura Pearl.

Finally I put Black Dazzlers from Creative Expressions to complete the whole thing.

I think that the Memory Box Window Dies are gorgeous and are fantastic for any sort of celebration card from weddings to Christmas.

That's all for now. Hope you have a great week.

Celina


Saturday, 28 September 2013

Finnabair Inspired Journal Cover & Bookbinding!!!September Prima Challenge BAP

I know that it has been a very long time since I posted anything here so I aim to do weekly posts from now on.


Last Sunday I along with about 30 other crafty minded people had an amazing time learning new techniques from the fabulous Anna Dabrowska aka Finnabair.  This was my second year learning from her.  She really is gifted. 

CardznScrapz did an amazing job organizing and hosting the day so hats off to Rosary and Lia for all their hard work. I'm sure that everyone in their team were involved as it was a tremendous day and the shop was diverse and well stocked. Needless to say this hurt my credit card (I'm almost certain I saw tears in my husband's eyes when he left) as I picked up a staggering amount of Prima stock that I absolutely had to have!! (When I got home, I realised, that was not the case at all).

It was fantastic!!

Now, one of the classes involved was learning how to do a canvas collage which was something I had never done  before so, when I got home that night to Waterford, I couldn't wait to do another one.

I thought well, what can I do this technique on that was not wall art yet sturdy enough to be a similar project?  I know, I'll make a journal cover and I will make a Coptic bound book out of it.  Woo Hoo!!!   


That is exactly what I did.

I covered a piece of mountboard and chipboard with canvas and it measured 25cm x 25.5cm

I glued everything together and folded 40 A4 sheets to A5 and made 10 signatures and once the cover was complete I sewed it all together.


In respect of her wishes I won't tell you how to do it and how I did this but I will tell you about the little extra touches I did to make it more personal and more Me! LOL!!!


I added lots of molding paste to the lace and ribbon and created texture with lots of the new Elementals Stencils by Finnabair (naturally) from Prima Marketing.  I also used, almost exclusively their wooden Icons and Junkyard findings.


I had taught my 6 year old daughter, how to do the 'caught in crystal technique'  with tissue and acetate and then die cut the smaller Jewel Goddess from Spellbinders out of it.  I let the purples and reds guide me in the colors of Luminarte sprays and silks I used. 


The letters were done with the Martha Stewart White Clay and alphabet molds. I didn't want it to look all even and symmetrical so I glued the letters on  slightly wonky as I wanted it to look a little more grungy. Here in Ireland you can get it online in CardznScrapz(follow the link above).  If they run out they will source more for you if you request it. 

Finally I highlighted a few areas with different gilding wax colours from Cosmic Shimmer from Creative Studios UK I wasn't able to find waxed thread so I made my own with a lovely lilac skein of embroidery thread and bees wax I got from Grubbs Framing here in Waterford City.

 
I love how all this turned out and it really challenged me to look at my projects in a completely different way.