Showing posts with label Ranger. Show all posts

Monday, 11 August 2014

Scraps of Elegance July Inspiration Board Challenge


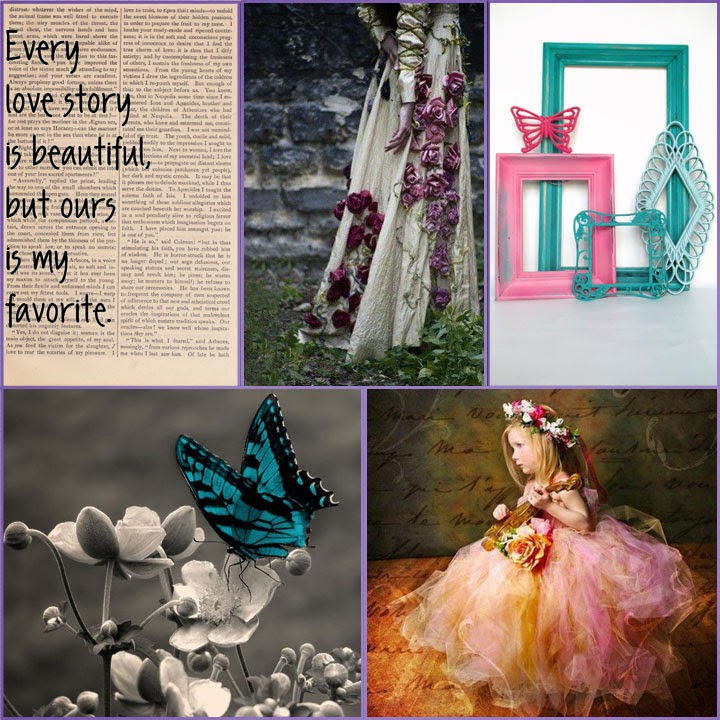
For July Melinda decided that an inspiration board would be the challenge for this month rather than the usual sketch for Scraps of Elegance


You can find the kit listed here and a description of all the products used.


Other Supplies Used

Elizabeth Craft Designs Silk Glitter
PaperArtsy Grunge Paste
Golden Extra Heavy Gel Medium (matte)
Tim Holtz Dies Ornate Frames, Courtyard, Lattice
Tim Holtz Distress Ink Walnut Stain
Tim Holtz Stars
Inkssentials Crackle Accents
Inkssentials Glossy Accents
Cosmic Shimmer Hologram glitter
PaperArtsy 9" x 11" stencil
Prima Butterfly Stencil
Prima Resin Frames
Fabscraps Die cut shape (Forever and Always)
Lindy Stamp Gang Hydrangea Blue Mauve embossing powder

I used the IB panel 3 had different frames and I cut out 2 from the Sizzix Ornate frames and applied glossy accents.  I accented those with a Prima rsin heart frame and embossed it with LSG desert moon turquoise


The first IB panel is focussed on the phrase so I used this one from Fabscraps and embosses LSG embossing powder in 2 layers to build it up and give it a great shine
The butterfly on IB panel 4 is shown in a few ways. I used the Prima Butterfly stencil with Golden extra heavy paste and put fuchsia silks glitter on most of them and Cosmic Shimmer Iced Snow on the rest.  I used the same colour on the board and put it in the glitter on the grunge paste on the circles.  I used the dark gray from the IB as my scrapbook page.  I used the reneabouquet butterfly as an accent.
On the last IB panel the little girl is wearing a crown of pink flowers which I put on the bottom right.  I also thought it looks aged so I used the clock charm to accent it.  I used the Prima Chalk pink through a paperartsy stencil.  I used the courtyard die to cut out all circles (like a crown)
I really hope Melinda keeps the IB panel because it works so much better than a sketch and most of us show much more than a sketch piece on the forum/community.

Tell me what you think

Hugs


Friday, 6 June 2014

Tim Holtz 12 Tags of 2014- A Technique That's So Much Fun for the Month Of June!!!

This is the technique that Tim Holtz posted for his 12 Tags of 2014 for June.

Normally because of the inclement weather I usually have to edit the dull look of the pictures.  Not This Time!!!  Yesterday the sun shone (I know it seems weird for Ireland), so all I needed to do was crop the photos. That means what you see here, is how vibrant and summery it truly looks!! I kid you not LOL :) 

I loved his tutorial so much that I've made 4 no 5 more tags of yummie-ness now!!!

To do this technique click on the 12 Tags link I've made above and it will go to Tim's blog where you can emulate him and post your own fab creations because it will give you fantastic results!!

It's essentially a watercolor letterpress technique and so simple that it's GENIUS!! 


Supplies

Wood-mounted Tim Holtz Change stamp
Tim Holtz - Stampers Anonymous Papillon
Tim Holtz - Distress Ink Pads - Mini Kit One (Picked Raspberry, Mustard Seed, Peacock Feathers & Spiced Marmalade)
Tim Holtz - Layering Stencils - Rays
My Stash Buttons, Metal flower
Junkyard Findings
Prima Resin Butterfly
Smooth Watercolour Cardstock
Kitchen Towels (to soak up excess liquid)
Scraps of Elegance Scrapbook Kit Club Clear drops & Hat Pins
Prima Large Clear Pebble
Foam Pads
American Seam Binding Ribbon White
Watermister
Beacon Quickgrip Clear Glue
We R Memory Keepers Corner Chomper Green Deco/Stub 
Tim Holtz Watercolor Fine Detail Waterbrush
Ranger Heat Tool
Ranger Black Archival Ink Pad
3/16 WRMK Big Bite Punch and lilac eyelet


When I did this technique, it didn't take long at all.  The most important step, is to thoroughly dry, the watercolor card, with a heat tool.

As the distress ink pads have to be applied to the reverse side of the stencil directly, it works best with the mini ink pads as more color can be applied to it and then spritzed with water and applied to the cardstock.  I have used the larger ink pads to bigger stencils with good effect.

I love vibrant colors like those in 'Mini Kit One', which naturally, was the first set I bought and the results were wonderful I think.


I used the Papillion Stampers Anonymous Butterfly Stamp, but because I didn't have the one that can be used with the Framelit Dies, I had to fussy cut them individually after I'd watercoloured them as per Tim's instructions.

The butterflies had been stamped onto the smooth watercolour card itself and the cut out ones mounted on double-sided foam pads to give it plenty of dimension.


I stamped the Change sentiment as well as all the other stamping with Black Archival Ink and heat set it so the watercolouring wouldn't bleed the stamped images

I thought that because have to go through a metamorphosis and emerge anew. 


I had lots of fun searching through my terrifying stash (some say trash.  I say whatever!!) to add the finishing touches to my tag after the corners had been chomped off by my WRMK Green CC on the Deco side.

I am not sure what the metal pieces came from (at least 1 is a Junkyard Finding or Finnabair cog maybe) and then I used the Large Clear Pebble from Prima.

The smaller pebbles are part of the Scraps of Elegance Kit for this month (more to follow with that kit Woo Hoo!!

Then the hat pins actually came from the Scraps of Elegance Flutter April Kit from which I snipped the off the sharp needle-points 
To finish I pressed all the mini distress ink pads that I used and spritzed generously with water and then dragged a long ribbon through it and then dried with my heat tool (Ranger of course LOL!)

Be sure to check out Mr Holtz blog (follow the link at the top of this post) and try out this technique for yourself with all the stencils and inkpads and glorious funness you have to play with and see how something so simple is so wonderful and creates amazing results.

Tell me what you think as I love reading comments.  It means I'm getting better at what I'm doing.

Hugs for Everyone,

Celina

Sunday, 25 May 2014

SOD Stationers Desk Large Tag May 2014 Facebook Challenge

I saw a post on Facebook about making something using a dressform (Tim Holtz die I believe) and if you didn't have the right die anything would be really ok as an alternative.

I'd made this tag which actually started off as a bookmark, magetized and everything, then it morphed into something else as these things always end up doing (everyone can relate right? :) )


  • 5 double sided papers from Prima's Stationer's Desk Collection
  • 5 double sided papers from Prima's Cartographer Collection
  • Prima: Stationer's Desk Collection - Pencil Flowers
  • Prims :Everyday Vintage Paintables 
  • Prima: Cartographer - Type Keys Clips
  • Prima: Ingvild Bolme - Mannequins
  • Ranger: Liquid Pearls - Copper
  • 1 Floral Bronze Metal Embellishment
  • Martha Stewart Circle Edge Punch Cartridge - Flower Arches (my stash)
  • DIY 3 x 4 Chalkboard Sheet (my stash)
  • Prima Stationers Desk - Tag Me - Ticket and Tag Set
  • Small Office Hinge Clip (my stash)
  • Tim Holtz Distress inks  Weathered Wood, Red Brick, Frayed Burlap, Old Paper (my stash)
  • Creative Impressions - Antique Ruler Twill Ribbon   


As you can all see, Melinda really delivered on a kit (I've said this a few times already I know!! LOL) that is so versatile.

I already had this made so I knew I would be able to post it in by the deadline.  I not sure if I like how it turned out.  I used everything except the chalkboard which, can be swapped for something else as the brass flower is actually adhered to an office hinge clip that I had in my stash.

I started off using a size #10 tag I believe and used the Stationer's Desk Red Romance and cut the paper down to size and distressed it by wetting it slightly and crumpling it up over and over and then ripped into the edges and opened it out and glued it to the tag.  Then I inked the edges with the Tim Holtz Distress ink (LOVE LOVE LOVE his genius!!!!) and put the twill ribbon under the cardstock and then inked that with some frayed burlap ink to age it too.

I put the wonderful big flowers bottom left and upper right that came in the kit and only stuck the bottom half and upper right of the flowers to the paper so the Paintables which I coloured with my distress markers Red Brick and Pine Needles a little.  Then I put the coloured image between the flowers and then used the Type Keys Clips and Stationers Desk Tags and Tickets and placed them around the paintables. Then I used the Martha Stewart French Scroll Punch with some of the Red Ink cardstock and applied it between the tag and red cardstock.  Used some Weathered Wood Ink to the edges of the punched out cardstock.  I put the mannequin piece from the kit on the top left and then thought it only looked ok.  Certainly not the best thing I've ever done and left it alone to wait for inspiration.

Later I realised that I needed to make another layer and see what would happen (I'm not a tag making sort of person.  It's a real crap-shoot how it turns out! (& no I've never played craps but I have seen Guys and Dolls loads of times and like the song 'Luck be a Lady Tonight') I love that movie!! :)

I used the Cartographer Faire un Voyage and used the Martha Stewart Flower Arches Cartridge and cut an 8" circle and then inked the edges with Frayed Burlap and Folded half to the front and glued the back.  I put tiny little dots of the Perfect Pearls Copper strategically as accents and then using the packaging from the Tickets and Tags and Used the WRMK Deco corner chomper punch side and then inked the edges and stuck on to the front of the circle.

Then I got the the Brass Flower and glued it to a small Hinge clip and Glued it to the top of the Deco cut piece and finally I got to finish it up using another piece of the resin corset and put that on the lower left and used some more of the tags and type keys to complete it.  After it was all done I used white chalk and scribbled it over the 3x4 chalkboard and then wrote Dress up time!!!  Fun Fun Fun

Hugs for Everyone

Celina

Wednesday, 5 February 2014

All Hail Moldable Film and Fibre

 Angelina Fusible film and fibre and Fantasy Molding Film and Fibre is something that I have had in my arty crafty arsenal for a long long time and I bought it a couple of years ago initially and had great fun with it for a while and then when I had used it all up, I kept meaning to buy more and when life got in the way as it does, I kept forgetting until I forgot all about it completely LOL!!


Blue Fire Fantasy Film with Lindy's Stamp Gang Venus Violet Blue Embossing powder 
Tim Holtz Stampers Anonymous Cling Stamp


Then a stange thing happened.

I was clicking my way around youtube as I often do (I have the attention span of a fruitfly when I'm bored) and I clicked on a video that I had seen before and it was about one of the ways you can use Angelina/Fantasy Film or Fibre.  She made really cool pendants using embossing powder, UTEE, glass and fantasy film.


You can stamp it, sew it, even wash it.  It only bonds to itself and fibre and you can keep the excess and bond it to more of itself and there is no waste at all.
abc
a. b. and c. are all done with the same film and embossing powder and PaperArtsy Hot Picks Mini Stamp but they all look different because of the ink pad or stamp paint
(a) is with Brilliance Silver Pigment ink (b) is actually Viva Decor Stamp Paint (Post on this fun line to follow and (c) is with Brilliance Platinum ink pad

So these are a few of the ones that I have made using different colours and Stamps and Different inks I used.
Up Close

 2x2 inch glass PaperArtsy Hot Pick stamps

I found my old stash of film and even fibre (after ripping my art room apart looking for it) and played, and played and played!!!!  It was so much fun and I really enjoyed the process and wanted to make many more eclectic pieces until well ... I used it all up :( .  So what I did then, is what I normally do.  I went online and bought some Angelina film and fibre from Claritystamps.co.uk and found out where I could get the same kind of Fantasy film and found it with the ArtGlitter.com and they had so many more colours and I bought 1 of every colour and it even comes in 20 inch wide in the Aurora for wearable art.  So cool!!!  It was super fast on the delivery as well from both web sites.


This is 1.5x1.5 glass and frame and I used I think a Hero Arts cling stamp and clear embossing ink pad. I love the subtle effect the clear ink gives this piece


Supplies
1. Fantasy Film
2. Clear UTEE
3. Embossing Powder (dark colours are best)
4. Ranger Memory Glass (2x2 1x3 1.5x1.5)
5. Memory Frames (not essential)
6. Versamark or any clear embossing ink pad
7. Stamp that is bold and not too detailed

Now to make;

1. press glass slide into ink pad and make sure it is completely coated and pour dark embossing powder and return excess to jar and melt with heat tool repeat this at least 3 times.
2. cut a piece of film approx 2x the size of the glass and scrunch it up as much is possible and leave to one side
3. once the powder is dry on the glass and cool to the touch press the embossed side of the glass into the inkpad and un-scrunch the film and press into the embossing powder
4. heat with the heat tool and it will shrivel the film but don't be afraid and let it cool down again
5. once the film is cool to the touch press the ink pad into the film and pour UTEE onto it and pour the excess into the jar and repeat step 1 two more times.
6. ink up the stamp with any sort of permanent archival ink that you want to use.  I used Brilliance Silver that takes a good while to dry because the Staz-on just wouldn't do what it was told to do and press very firmly into the UTEE whilst it is still hot.
7. once it has cooled down angle your scissors slightly and cut off the excess around the glass and slide into a memory frame.  

It's so fun and I gave them to a few of my aunts and they seemed to like them.

I'm putting the film on everything and anything and it looks fantastic!  Really does live up to its name.

That's all for today.  Let me know if you like what I made using just one truly fun technique.

I hope you are all well where you are and take care of yourselves.

((Hugs))
1x3 This has a little fibre under the film and gives more depth

They make great key chains & its portable art
I love that the stamps look a little celestial

 
Celin

Wednesday, 16 October 2013

12 Tags of 2013 October

Once again it's another Tuesday and as I was going over new posts from my favorite blogs I came across Tim Holtz.  I saw his October tag and he made it look really easy so I thought, why not?


All I had were his distress inks, distress glitter (Black Diamond & Clear Rock Candy) and nothing else.  As it's about technique not products I thought just this once I'll give it a go.  I can use something similar and try and get a similar look if nowhere near accurate!!  I needed Distress Ink (I had that) Distress Glitter (I had 2) Distress Paint (I substituted Acrylic paint), Archival Ink (I had that) Bigz Dies (No luck there. I had Spellbinders Halloween ones though), some  Ribbon and Rangers Clear Glossy Accents.

I started off well enough. I used the dies to cut out a graveyard scene, a flying witch and a spider which I covered in Glossy Accents and smooshed it with my finger and poured Black Diamond Dry Glitter all over it. I left them under the mountain  of glitter for a few minutes and resisted the urge to pat the glitter down and then cleaned up the mess and put those pieces to one side. Now I went a small bit off course (later I went off planet, never mind Off Course!!!!)  


I didn't want to use the Black Diamond Dry Glitter again because I wanted to have a stalagmite/stalactite calcified impression to the gravestone strip so it would give this part of the tag a decayed mouldy look that I think came out better than I thought it would.  I was quite shocked it turned out so well because I was absolutely convinced it was going to go in the bin.  I painted it in purple let it dry and covered it in purple fine glitter (accidental) and thought I'd try and save it so I covered it again in glossy accents and put Rock Candy dry glitter all over it.  I let it harden a little, I sprayed Glimmer Mist Blood Red (I think?) from Tattered  Angels generously and put it to one side all the while praying to the Divine Artist that I wouldn't have to do a do-over on that piece again LOL!! 


Next the tag itself. I didn't have a big big one so I cut out a Size 10 one myself from a 21cm x 10.5cm.  I poured a little Golden Flow Improver and Golden Fluid Acrylics Iridescent Gold, Ultramarine Violet, Hansa Yellow and Vat Orange. I spritzed them with water and swiped the tag through them in different directions. I dried it a little with the heat gun and spritzed the tag with water and soaked the excess with a kitchen towel. I dried it completely once I was happy with the marbelizing effect on the tag.

Dry, I inked a script stamp from IndigoBlu with black Archival (Ranger) and because I didn't want a uniform, perfect impression on the tag I placed the stamp down without an acrylic block lifting it off and down here and there on the tag.  


Dry, I saw that it really wasn't spooky or grungy enough so I thought, for a moment, about what to use to give it a worn and almost grimy appearance (brassy, just like I had always imagined the silver and cutlery in Ms Havisham's dining room from then fantastic book, Great Expectations by Charles Dickens).  I wanted a real worn foil effect to make the tag look old, decayed and tarnished.


So I applied some IndigoBlu Flake Adhesive on some cut'n'dry foam and pounced lightly all over the tag and put their Yorkshire Dales Flakes and scooched it off. Normally I gently rub the flakes off but to give it a really worn matte effect  I rubbed much more off and repeated the process with Sheffield Steel flakes.  

That done, I aged it more with drops of ink and let it run down the tag a little and dried it off until I was happy with the overall look.  

As I had a spider die-cut I wanted to give him a cobweb so I used the one from Spellbinders.  As it's detailed I put wax paper closest to the die and when I popped the 1st one out I loved the way the wax paper looked as well so I repeated the same process to more times and l glued the wax paper to each cobweb piece slightly off setting them.


Next came the putting it all together stage (my favorite part).  I glued the 1st cobweb and put it on the upper left corner. I threaded the spider body so that it would move on its own.  The next cobweb I put on the lower right side and then adhered the graveyard strip on top.  Once that was dry I put the last cobweb on the right of that so it looked like an uneven spooky web.  I used black foam pads to stick the flying witch off the tag and then aged a Happy Halloween Label to the middle of the tag and finished it off with ribbon that I coloured with ink and scrunched it up and it looked as if it had been soaked in real blood, and then dried it and threaded it through the eyelet of the tag.  


I had so much fun that, I've ordered lots of Tim Holtz products and bought his online Chemistry 102 course.  I think he is a visionary and a genius when it comes to all things artistic and crafty in this world.  Some day I'd love to meet him and learn from him in person, or at the very least see him in CHA (even though I don't have a shop!)

Hugs for now and I'll post again next week!!

Celina

PS : everything in this post I purchased from Cardz and Scraps, Create with Kate or ebay